
As a wildlife and natural history artist, I paint and sketch all sorts of different flora and fauna and it brings me great joy says watercolour artist Cath Hodsman.
If you have an artistic side and a love of the nature, watercolour painting is a wonderful way to connect with the natural world in greater depth than by gardening or reading books on the subject. Anyone can have a go. The most important thing is to have a passion for both, and everything will follow.
Watercolour paints have a delicate quality that emulates the fragile beauty of nature perfectly. For this tutorial, it makes sense to celebrate the charm of natural Britain by painting a British wildflower. They are lovely to paint, although sadly it is becoming rarer and rarer to see wildflower meadows.
I have chosen one of my personal favourite species, which blooms from May to July – the ragged robin or Lychnis flos-cuculi. This indigenous flower encapsulates all the qualities that make wildflowers special.
It is dainty in structure with long delicate stems and small, shaggy flowers. It has a beautiful and ethereal aura. Its colour is soft and subtle – a lovely blush pink (although it comes in white too). It is also loved by bees, so it is an important food source for insects, too.
How to paint flowers
With each step of my easy-to-follow painting tutorial, I will show you how to replicate the lovely qualities that makes this flower so special.
What you need to paint flowers
- Good quality watercolour paper that isn’t too textured. Hot pressed is best for soft watercolours. I use Daler Rowney hot pressed watercolour paper, 140lb, 300 g/m2.
- Schmincke professional watercolour paint blocks.
- Daler Rowney FW Pearlescent liquid acrylic paint in white.
- Good quality watercolour paint brushes in sizes 6 and 3/0. I use synthetic brushes rather than sable, as sable goes against my conservation values.
- HB/B pencil.
- Putty rubber.
- Artist’s scalpel.
- Flower specimen and your own photographic records.
- Masking fluid.
Paint colours for the ragged robin
Violette, permanent green, light green yellow, madder lake, indigo, black, orange and cadmium red hue
How to start painting flowers
Step 1 research
First, you need to gather your reference material for the painting. I paint from life and back this up with my own photographic material.
I also use reference books. These are great for double-checking structural details that aren’t apparent, or
even for ID purposes.
Step 2 drawing
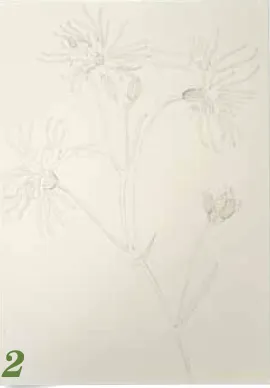
At this stage I lay down the foundations of my study. This includes the plant positioning and content – what buds, leaves, blooms and stems to include and where to put them in the composition. I always try to incorporate as much information on my subjects as possible. I like to capture an insect’s-eye view of the world – one that is low-level, so it almost feels as though I am a bug, crawling or flying among the wildflower meadows.
When doing my initial drawing, I choose a pencil lead that is not too hard or too soft. ‘B’ is fine. If I use a softer lead, then the outline will be too dark and may smudge. If it is too hard, any mistakes are hard to erase completely as a hard lead leaves grooves in the paper.
Try to use up all of the paper, so the composition looks balanced and full.
Choose a ‘hot pressed’ watercolour paper. It has a smooth texture that doesn’t detract from the little details.
Step 3 - first wash
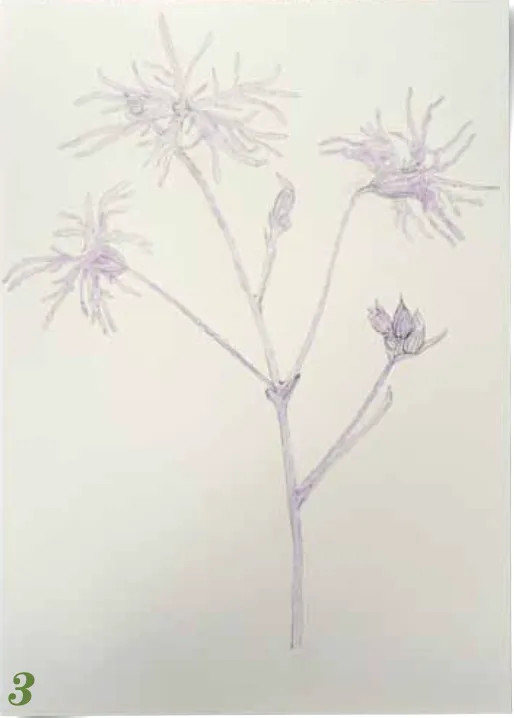
Watercolour painting is all about applying layersof paint called ‘washes’. A wash is a light mixture of a chosen colour and water. Many washes are applied to the paper. With each new wash applied, the depth and vibrancy of colour builds up. The unique and lovely benefit of watercolour paints is the effect that this has on the composition.
Each wash is translucent and therefore each one can be seen though the others. This gives a depth and delicacy that is not possible to get with oils. When using watercolours, there are a few golden rules to remember:
- Remember to go from light colours to dark when applying washes
- It is important to wait until each wash has dried before applying another. If I apply a wash to one that has not dried, I’ll end up taking paint off (rather than adding it) or blending the two washes
Remembering these tips, I choose the lightest colour first and apply this as my first wash using a size 6 brush – the larger of my chosen selection for this study. TIP: • Apply the wash using uneven strokes, as this will make for a softer, more subtle effect, which helps capturethelightdancingonthelychnis’ragged petals and emphasises its delicate structure. • When the first wash has been applied, I will have something that looks like the image to the left.
Step 4 - building up colour depth
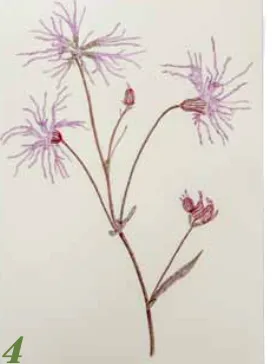
For each extra wash applied, I use slightly more paint and less water. This helps to build up the colour richness. I add more washes of violette until I am happy with the depth of colour. The ragged robin is a very pink plant, but its stems and leaves are tinged with green. For the green washes, I use a mixture of permanent green and light green yellow. Once this additional wash is added, I can add other colours too. For the buds and stems, which are flushed with a deep red colour, I make up a wash of violette and madder lake and paint it on the relevant areas. I then turn my attention to the flower structure, using thicker washes to mark out the ridges on the buds and the leaves. For the finer details, I change my brush and use my 3/0.
Step 5 - refining the painting
Once I have added all of the colours I need in the composition, I refine the painting by shading.
It is important to remember that shadows are never black. They always take on the colour of the object that they are shading. For the ragged robin, I choose touseindigo. This is a very dark blue, which has subtle shades of pink in it – perfect for this.
✽ Masking fluid
If there are areas on the flower that I want to leave white and not washed out, I use masking fluid. This is great stuff. It is a thick fluid that can be applied to relevant areas. It dries quickly and leaves an area that can be painted over without leakage. When finished with, it can be gently scraped off using the end of a clean undamaged paintbrush.
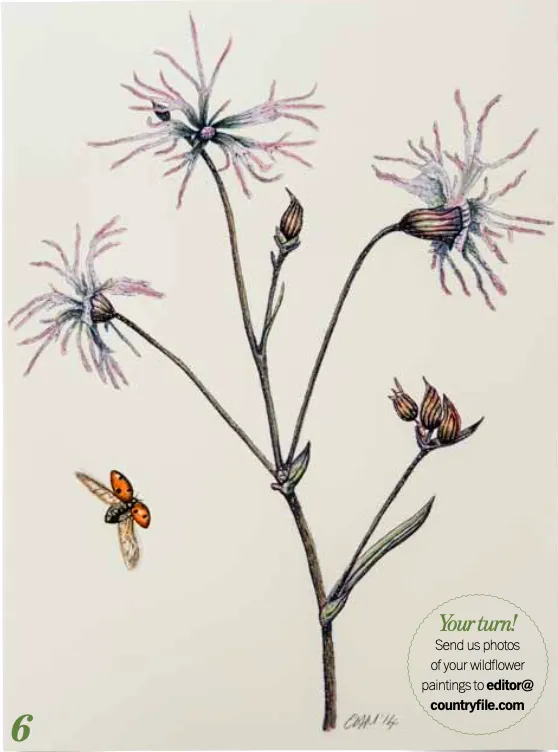
Step 6 outlines...and a surprise
When there is enough colour depth to my painting, I turn to the final stages. Taking my 3/0 brush, I add a delicate broken outline to each petal (a broken line always looks more natural). I also use madder lake with the same brush and lightly paint in the veins that run down the centre of each flower petal. This adds to the three-dimensional effect of the piece. I do the same with the buds.
The stem of the ragged robin has very fine hairs on it. To emulate the light bouncing off the hairs that are in the shaded areas of the painting, I take my artist’s scalpel and gently scratch off paint in tiny stokes. It is a natty trick. Don’t take off too much paint and don’t go in too hard or you could go through the paper... but if you get it right it looks great. For the hairs coming out of the side of the stems, I take my 0/3 brush and a very light and dry wash of indigo and flick the tiny brush down each side of the stem.
As a final flourish, I add an insect to the piece. To me the two are virtually inseparable. Their lives are so interlinked that I can’t see one without the other. The addition of the seven-spot ladybird painting also offers a sense of scale. And I don’t think you can look at a ladybird and not smile, so it adds a bit of extra happiness, too.
And that is it! I hope you enjoy painting this as much as I have. It is great to use art to pay homage to the beauty of wildflowers and the natural world as a whole. Good luck with your endeavours!
Painting the ladybird
Isolate areas of shine on its abdomen and wing cases with masking fluid. I apply this with the end of a paper clip, as the areas are tiny. To paint, I use cadmium red hue and orange, and black on the body. For the ladybird’s wing beats, I paint out the lines with a light wash of black. After gently scrape off the masking fluid with the end of a paintbrush, I blur the edges with wash to make them look softer. Finally, with my size 6 brush, I sweep liquid acrylic pearlescent white paint over each wing for that irridescent effect.
Cath Hodsman is a British wildlife and natural history artist. She is an Associate Member of the Royal Society of Biology and features in art collections around the world.
The main thrust of her artwork today is painting & studying insects, to help highlight their importance & relevance in the natural world and as such, I run unique & fascinating art-workshops on the subject. Details of those I have lined up in the forthcoming months can be found on her Linktree page.
Photos by Jason Ingram
Has this inspired you to get painting? Read on:


