How often are you tempted to set your compact digital camera to auto to take a photograph? It saves having to read the manual and work out the often fiddly manual settings and the result is… well, it’ll do.
But if you take just a little bit of time to get to know your camera – the time it takes to read this article, infact – you’ll find that you’ll begin to take consistently better-quality and more creative images. And that’s what the judges of this year’s Countryfile Calendar Photographic Competition will be looking for when the competition is launched later this month (look out for announcements on here soon).
The camera world seems to be divided roughly into three key areas. Cameraphones, Digital SLR cameras and compact digitals. We’re going to focus on compact digitals as they are much smaller, cheaper and simpler than SLRs (and can fit in your pocket on a walk) but have lots more functions than a cameraphone.
The model we experimented with is made by Canon but all the big camera manufacturers – Sony, Nikon, Panasonic, Fujifilm etc offer similar compact digitals with much the same features. The more sophisticated models have touch screens, facial recognition and other clever features but we’ll be focusing on the fundamentals.
First we’re going to look at the basic functions and settings. The three most important are: aperture size, ISO and shutter speed. These all work to adjust the amount of light entering the camera. Once you understand what each does, you can experiment with them to see how they affect your photos.

Display - As you adjust your settings, the camera will show most of them on the screen. You can turn this display on and off using the button to the right of the screen marked DISP.
Image alignment - Not all cameras have this handy feature but it tells you when your image is perfectly horizontal. It’s useful because it saves many a great photo from being ruined with a wonky horizon – a cardinal sin for a landscape photograph.
Manual settings - M, Av (or A on some cameras), Tv (or S) and P are the main user controlled shooting modes. M (manual) allows you to adjust aperture and shutter speed. Av is aperture priority, Tv is shutter priority and P is programmed auto, which offers you a series of pre-programmed settings.
The top dial - This has a whole range of settings. Some are variations on the theme of auto: auto itself, portrait, landscape and perhaps one or two others. Ignore these. We’re more interested in the manual settings:
Tv or S (shutter priority – known also as time value), A or Av (aperture priority/value), and M (manual). These are the settings that allow you to access the camera’s secrets.
Accessing functions - On this model, turning this wheel allows you to adjust aperture and shutter speed when in manual (M) mode. You switch between the two by depressing the ring at the top. Depressing the ring on the left toggle turns macro (MF) on and off, while on the right it switches the flash on and off. DISP means display and turns the text on or off the main screen to the left, which can be helpful as it can get quite cluttered. FUNC SET allows you to access ISO, Auto White Balance (AWB – see over) and other functions.
Macro - Want to take a fabulous close-up image of a flower or an insect that captures every detail? It’s likely your camera will have a macro setting – on most models this is operated by a button with a flower symbol, rather like a tulip. Always remember to turn off your macro setting when you return to taking normal shots, or you’ll end up with blurred results.
Aperture size - Aperture or F-stop – the hole in the camera that lets light in. A wider aperture (lower F-number) allows you to create a shallow depth of field, ideal for focusing on one element in the picture – for example, if you wanted to take a portrait of someone with an out-of-focus background. The smaller the aperture (and the higher the F-number), the more of the photograph will be in focus, which is great for taking landscape images.
ISO light sensor - The ISO (International Organisation of Standardisation) measures the sensor’s sensitivity to light. The lower the ISO number is, the less sensitive it is and the better for taking photos in bright sunshine, creating sharp images.
In lower light levels, you can turn up the ISO to capture brighter photos. The downside is that the image quality is likely to deteriorate and become grainy.
Shutter speed - The length of time the camera’s shutter is open is used to control the amount of light entering the camera. The slower the shutter speed, the more time is available for movement to be recorded, which can ruin an image or be part of the creative process. The faster the shutter speed, the more likely the image will be sharp and clear.
The best way to really get to know these settings well is to have a photography day. Take multiples of the same shot adjusting the aperture, ISO and shutter speed individually, and review the images there and then. Just don't delete any until you get home! It's easier to see the detail and more subtle changes on a bigger screen and you may have taken one worthy of our competition.
Here are some ideas:
For aperture, choose a subject in the foreground and background that's some distance away (flower beds are brilliant for this, or a fence with a perching bird). Adjust the aperture and see the fore/background become the focus of your image.
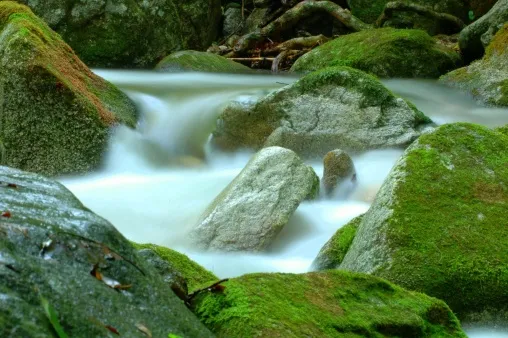
A great subject for testing shutter speed is water. Find a river or stream that flows quickly over rocks. A faster shutter speed will produce crisp, sharp water that looks almost like ice, whereas a slower speed will make water look like frothy clouds. Take a tripod though as on slower speeds the camera will need to stay completely still.
If you can find a wood, this is perfect for adjusting your ISO. Test a low ISO on sunlight streaming through the canopy with a dark surround. Then slowly increase the setting and see the rest of the wood come in to the picture too.
